Moscow Muled – A Roundup of 20 Moscow Mule Recipes

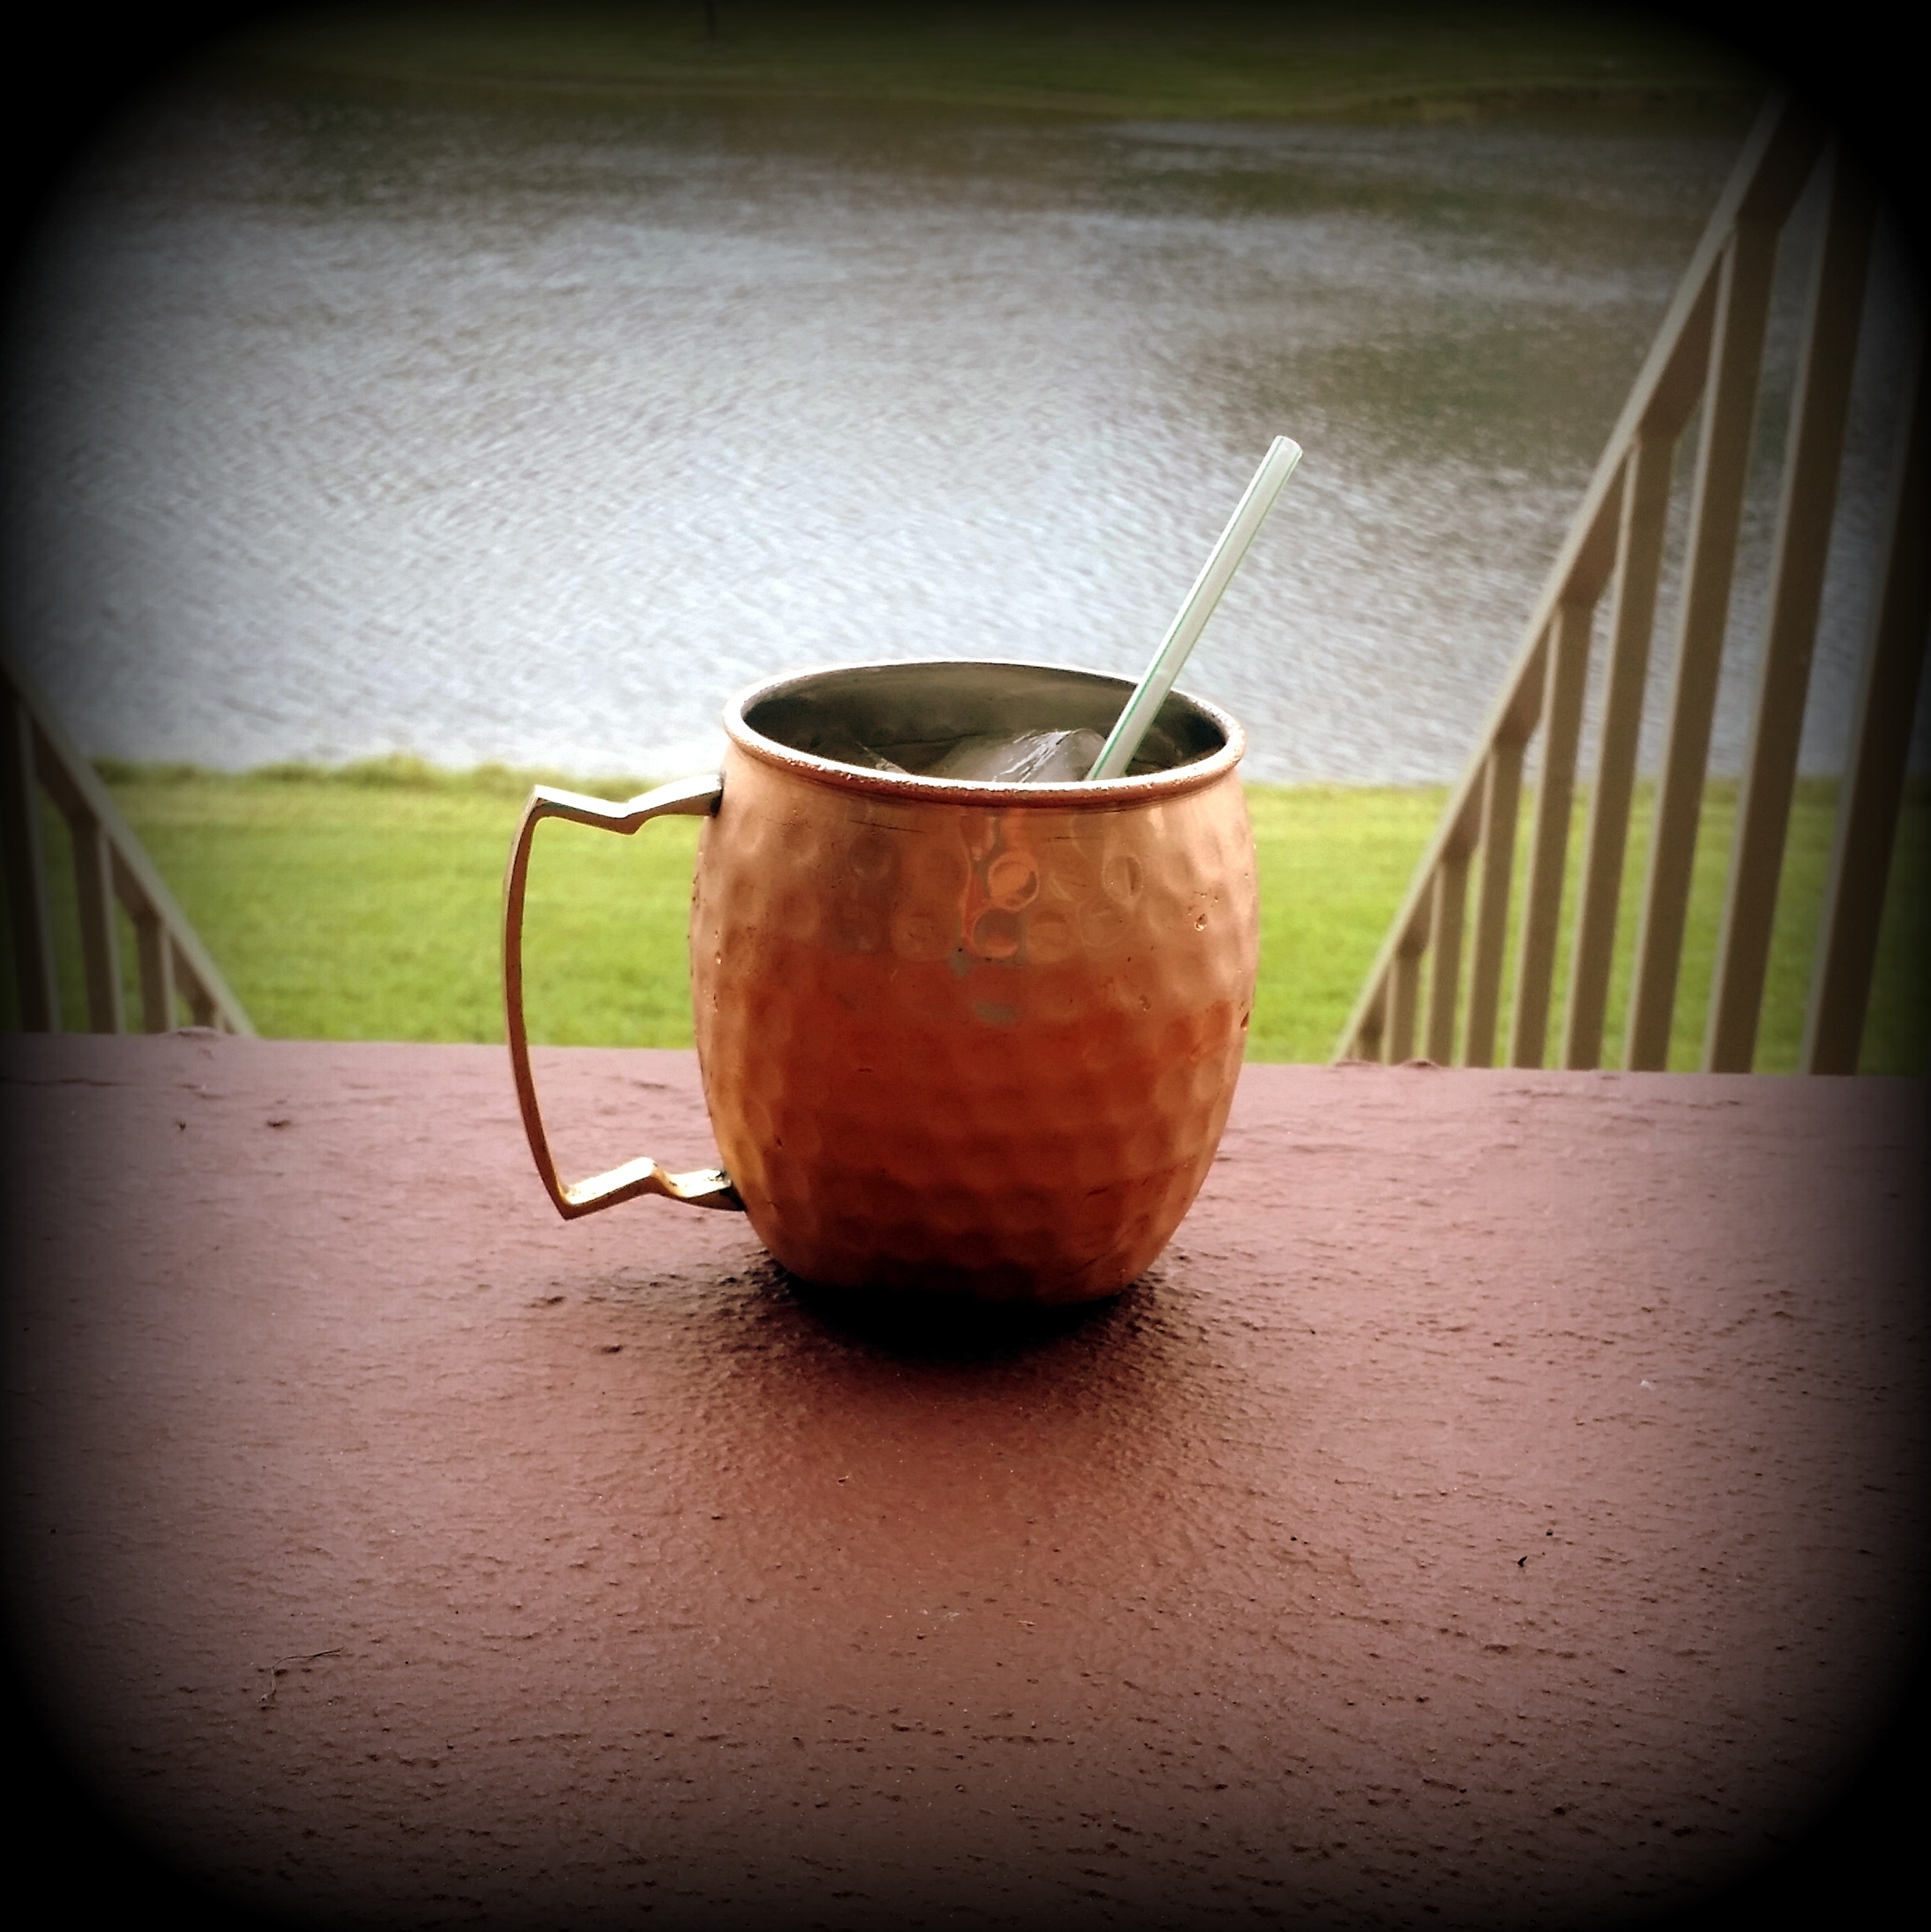
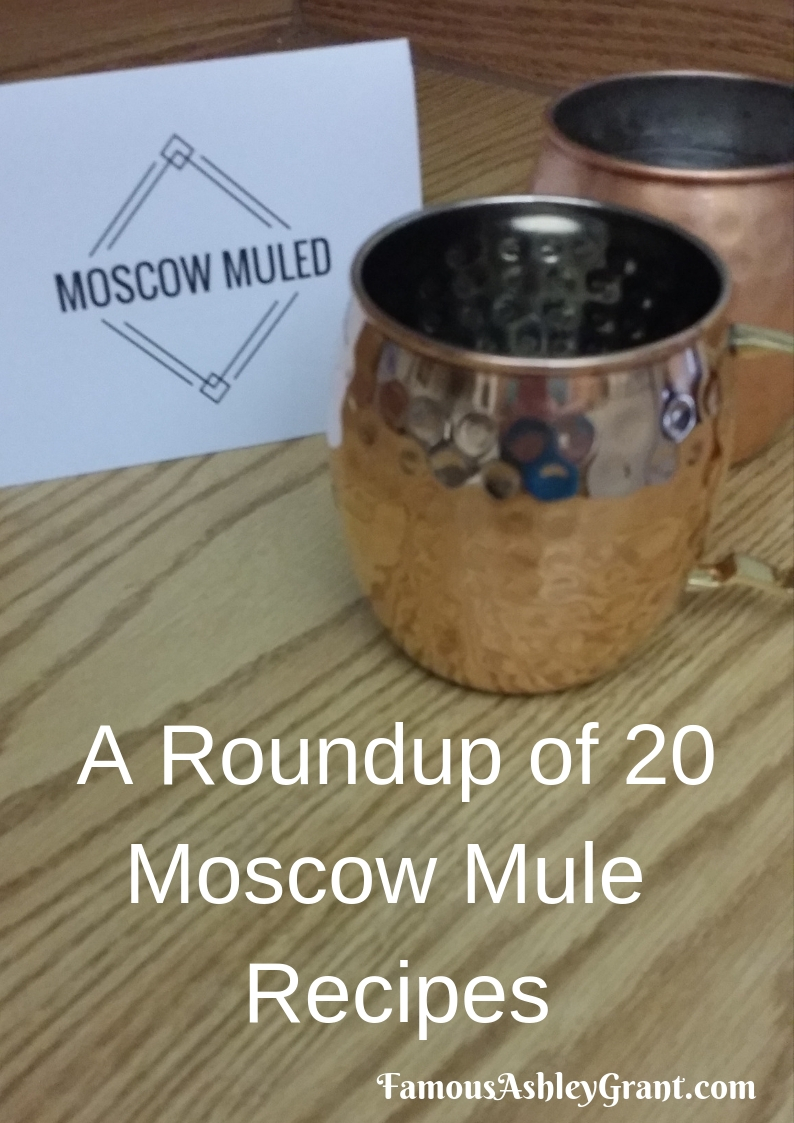
The awesome folks from Moscow Muled sent me some kickASH Moscow Mule mugs. Of course that meant I needed a bunch of Moscow Mule recipes to try, now that I have some nifty mugs. Am I right or am I right?

So, I did what I always do when I need recipes – I went to my bloggy friends to ask for help. As per usual, they did not disappoint!

My usual go to for a mule is the traditional recipe of 2 oz of liquor, 4-6 ounces of ginger beer, and a squeeze of lime. These ingredients are all poured into a Moscow Mule mug over ice. My favorites have typically been the traditional mule with vodka, or a rum mule with dark rum. But, what I love about the recipes below, is they take the traditional mule, and add a yummy twist.

After seeing these 20 recipes, I can’t wait to play, and mix and match until I find some new go to mules! Check them out, and get to mixing. Please drink responsibly!

1 . How To Make An Apple Cider Mule Cocktail
2 . Carrot Moscow Mule Cocktail
3 . Strawberry Basil Moscow Mule
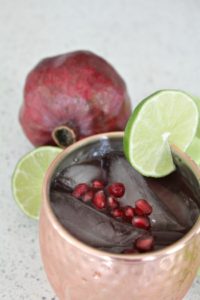
4 . Pomegranate Moscow Mule Recipe with Pama Liqueur

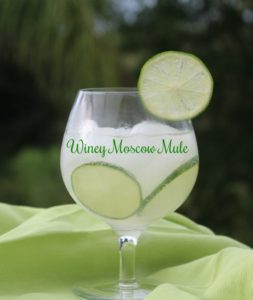
5 . Winey Moscow Mule Cocktail
6 . French Mule Cocktail
7 . Simple Pineapple Moscow Mule
8 . Cranberry Moscow Mule with Homemade Cranberry Simple Syrup
9 . Mango Moscow Mule
10 . Sandia Burro (Watermelon Mexican Mule)

11 . Sun Kissed Moscow Mule
12 . Peach Moscow Mule
13 . Beet Moscow Mule
14 . Kombucha Moscow Mule

15 . Christmas Moscow Mule
16 . Irish Mule Cocktail
17 . Chilcano Mule
18 . Hibiscus Moscow Mule
19 . Blue Mule Cocktail Recipe
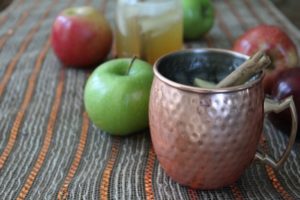
20 . Spiced Apple Moscow Mule


Click here to learn about Moscow Muled – the only mugs on the market that are made from 100% pure high-grade food-safe copper, and lined with high-grade nickel.

I love a good Moscow Mule, and this post features 20 awesome Moscow Mule recipes.

Did you like this Moscow Muled post? Check out some of my other drink posts:

Bourbon, citrus and vodka - oh my! This Harvest Moon Martini might just have you howling!

This drink is so good, it's WICKED! If you are looking for a tasty Halloween cocktail, you have to try this Wicked Green Ice Cocktail!

Create an Adorable Love Bug Tabletop Photo Holder

Are you looking for a unique gift or sweet craft to do with your children this Valentine’s Day? Are you on a tight budget but want to something nice to a loved one? If you want a gift that your loved one will look at and think  of you, well you have come to the right place! Because in this post, you’ll learn how to make a unique Valentine gift that your recipient will surely love.

This adorable love bug tabletop photo holder is more than just a gift, it’s an upcycle craft. Y’all know how much I love to upcycle. It combines photos and simple materials, and here’s how to make it:

This post may contain affiliate links that provides this blog with a small commission if you purchase through them, at no additional cost to you. Thanks for your support!

Before you begin, gather all the materials needed for this tutorial:


a clean yogurt cup or clear 9 oz SOLO Cup
pink, red, and black construction paper
2 purple pipe cleaners
red acrylic paint
paint brush
a black Sharpie or any black permanent marker
3 red paper clips
1.5-cm in width pink grosgrain ribbon with heart design
an awl hole crafting tool
a pair of scissors
hot glue gun and hot glue sticks
• 3 small photos

Step 1:

Paint the yogurt cup or 9 oz clear cup with red acrylic paint. Let it dry for an hour. You can double coat or triple coat this if necessary.

Step 2:

Cut three medium-sized hearts from the red construction paper. This will be the bug’s wings.

Step 3:

Cut three medium-sized oblongs from the black construction paper. This should be proportionate to the heart since it will serve as the head of the bug.

Step 4:

Cut three medium sized pink circles. This is the abdomen of the bug.

Step 5:

Glue the head on the tip of the heart wings. Do this for the remaining two as well.

Step 6:

Glue the pink circle on the rear end of the bug’s wings.

Step 7:

Add some details on the face of the love bug. You can create some cut-outs from the pink construction paper for the eyes, lips, and dimples. Other details that can be made on the wings can be done using a permanent marker.

Step 8:

Cut six pieces that are 3 centimeters long of the purple pipe cleaners. These pieces will become the antennas of the love bugs.

Step 9:

Curl one end of the six pipe cleaners and glue a pair of antenna on the head of the bug from the back of the head.

Step 10:

Hot glue the red paper clip on top of the antenna at the back. This should be placed in between the two antennae.

Step 11:

Cut 3 pieces of purple pipe cleaner into 5-centimeters, 7-centimeters, and 9-centimeters, respectively. Glue the pipe cleaner on the gut of the bug at the back. This is the stem of the love bug photo holder.

Step 12:

Create three holes on the bottom part of the yogurt cup using the awl hole crafting tool. If you don’t have an awl hole crafting tool, you can poke a hole with the tip of a knife – don’t let kids do this part alone.

Step 13:

Insert the love bugs on the holes on the yogurt cup base. It may help to add a dab of hot glue to keep them from moving in the cup.

Step 14:

Create a bow from the pink grosgrain ribbon and glue it in front of the base cup, right in the middle of it.

Step 15:

You can now insert your photos through the clips at the back of the love bug.

Step 16:

Tada! Done and ready for display!

This adorable love bug tabletop photo holder is a perfect gift for your loved one this Valentine’s Day. Make it extra special by adding pics of memorable moments of you together. Isn’t it sweet? Have fun and spread the love!

Check out some of my other craft posts:

Air fresheners turned Halloween decorations? Indeed! I LOVE taking something that would ordinarily be garbage and transforming it into something super fun! Make your old candles new again by melting the remnants down, and pouring them into one upcycled candle.

Free Valentine’s Day Printables

I love freebies. Like a lot! And when it comes to holidays, I often try to find free ways to decorate and celebrate before the thought of buying anything crosses my mind.

One of my favorite holidays is Valentine’s Day. I know some people believe it’s cliche, and a corporate sponsored holiday. On the flip side, lovers in love adore the day and all the sweet goodies it brings.

Say what you will about it, I love the day. Even if I too fall into the category of those who feel you shouldn’t wait until Valentine’s Day to express love. Haha! Every day should be a day of love when you’re in a relationship…but I digress.

Because of my love for freebies and all things holidays, I went in search of free Valentine’s Day printables to share with you all. I asked my bloggy friends for all the goodness, and they did not disappoint. Printables are great as long as you’ve got a thermal printer, because this kind of printer is super fast and prints things out in the best quality. This will really help you to make the best impression on your loved one with this fun idea, whilst also saving money! Win win! Below you will find a plethora of awesomeness. Check it out!

Free Valentine’s Day Printables

1 . Fortnite Valentines day cards with free printable
2 . DIY Valentine’s Day Coffee Spoons with Printable Tags
3 . Applesauce Cup Valentine’s Day Free Printable
4 . You Are Write For Me Classroom Valentine Printable
5 . Mandarin Orange Cup Valentine Free Printable
6 . Glow Stick Valentines: Simple DIY Valentines for Kids
7 . DIY Dinosaur Valentines (with a free printable!)
8 . FREE Animal Valentines – Unicorn, Sloth, and Narwhal Valentines
9 . Printable Disney Valentines
10 . You’re Totally AwesomeSauce – Cute Kids Valentine with Free Printable
11 . Kids Valentine Printable Coloring Page – “You Color Me Happy”
12 . Mustache Valentine Cards Free Printable
13 . Valentine Cards Printable: Owl Coloring Page
14 . You Color My World Valentine Free Printable
15 . Whimsical and Colorful Valentine Printables Cards for 2019
16 . Valentine’s Day Volcano Science Experiment with Free Valentine Cards
17 . Valentines Day Slime – Fluffy Slime with free Valentine’s Day Printables
18 . Printable Star Wars Classroom Valentine Cards
19 . Sweet Candy Jar Valentines
20 . These Printable Emoji Valentine Cards Are So Much Fun {And They’re FREE!}
21 . Free Star Wars Printable Valentines: Lightsaber Glow Stick Valentines Cards!
22 . Printable Fortnite Valentines | Free Printable Valentines
23 . Slime Valentines | Free Printable Stickers!
24 . Valentine’s Day Word Search Printable Worksheet
25 . Baby’s First Valentine’s Day + Printable DIY “Be Mine” Valentine Banner
26 . “You’re Just Ducky” Free Valentine Printables
27 . Emoji Bookmark Valentine’s Day Cards
28 . Kids Valentines Cards: You’re A Gem (Printable)
29 . Valentine’s Puppies Roll and Cover Game
30 . Valentine’s Day Writing Prompts for Kindergarteners
31 . Valentine’s Friends Roll, Add, and Cover Game
32 . Are you looking for some fun Star Wars Valentines for your kids?
33 . Are you looking for a fun Bouncy Ball Valentine?
34 . These Bubble Valentines are perfect for toddlers and younger Kids?
35 . These You Light Up My World Flashlight Valentines are another great Non-candy Valentine option.
36 . Your kids will love these fun Stuck on You Valentines!
37 . FREE Printable Unicorn Valentines
38 . Do your kids love playing BINGO as much as mine do?
39 . Activity Valentines
40 . A Simple & Cute Llama Valentine Craft For Kids (With Free Printable)
41 . Free Printable Star Wars Valentines Every Fan Will Want
42 . These Super Mario Valentines Printables Are Guarenteed To Be The Class Favorite
43 . Free Super Hero Valentine’s Day Card Printables!
44 . Free Printable Harry Potter Valentine Cards
45 . Free Mermaid Themed Valentine Card Printables
46 . Free Printable Valentine Cards: “I Lava You”
47 . Free Printable Valentine Bingo
48 . Free Printable Valentine’s Day Word Search
49 . Free Printable Valentine Lunch Box Jokes
50 . Free Printable Llama Valentines
51 . Free Printable Valentine “Valenslime” Labels
52 . Free Printable Pen Valentines
53 . Cute and Easy Valentine’s Day Nature Craft
54 . “You Are My Squishy” – Unique Non Candy Kids Valentine Idea
55 . Cereal Valentines with Free Printable Gift Tags

Slow Cooker Mexican Shredded Chicken with Cilantro Lime Rice

This delicious, healthy slow cooker recipe is as easy as it is versatile. This flavor-packed chicken is perfect for burrito bowls, lettuce wraps, or over a bed of flavorful cilantro-lime rice, and topped with creamy cilantro-lime sauce (recipes below).

Slow Cooker Mexican Shredded Chicken

Tip: Don’t skip the squeeze of fresh lime juice after cooking. It really brightens the flavors and pulls them all together.

Prep time: 15 minutes
Cook time: 3–8 hours
Serves: 4-6

Ingredients:

  • 2 lbs. boneless, skinless chicken thighs
  • 2 10-oz. cans Rotel fire-roasted diced tomatoes & green chilies, undrained
  • 2 15-oz. cans black beans, rinsed and drained
  • 3-4 cloves garlic, minced
  • 1 small jalapeno pepper, finely diced
  • 1½ T. hickory-flavored liquid smoke
  • 2 t. ground cumin
  • 1 T. chili powder
  • 1 t. smoked paprika
  • 2 t. dried oregano
  • 1 t. cayenne pepper
  • Salt and black pepper, to taste
  • 2 limes, quartered
  • ¼ c. fresh cilantro, chopped

Directions:

  1. Unroll and add chicken thighs to bottom of a 5 or 6-quart slow cooker crock. Top with tomatoes, black beans, garlic, jalapeno pepper, liquid smoke, cumin, chili powder, smoked paprika, oregano, and cayenne pepper. Season with salt and black pepper, to taste. Stir to combine, making sure the chicken thighs are coated and submerged in the liquid.
  2. Cover and cook on high for 3-4 hours or low for 6-8 hours. 30 minutes before done cooking, remove lid and shred chicken while in the slow cooker with two forks. Stir to combine shredded chicken with other ingredients. Cover and cook for remaining 30 minutes to allow chicken to absorb the flavors.
  3. Remove lid and squeeze fresh lime juice into the crock. Add cilantro and stir to combine. Season with additional salt and black pepper, if desired.
  4. To serve, spoon chicken mixture over plain brown rice or cilantro-lime rice. Top with cilantro-lime sauce (recipe below) if desired. Serve with remaining lime wedges. Enjoy!

Cilantro-Lime Rice

Transform boring, basic rice into something extraordinary with the addition of a few fresh ingredients. In this recipe, lime and cilantro are paired to create a classic flavor combination that brings added depth to your dishes.

Prep time: 5 minutes
Cook time: 45-55 minutes
Serves: 6

Ingredients:

  • 3 c. cooked rice*
  • 3 T. fresh lime juice
  • 2 t. lime zest
  • 3 T fresh cilantro, chopped
  • Salt and black pepper, to taste

* Can use white, brown, or jasmine rice. (Brown rice is shown in the images).

Directions:

1. Prepare rice according to package directions.

2. Fluff cooked rice with a fork and stir in fresh lime juice, lime zest, and cilantro until blended. Season with salt and black pepper, to taste, and serve immediately.

Creamy Cilantro-Lime Sauce

For best results, prepare the cilantro-lime sauce the night before you need it to give the flavors a chance to blend. Planning ahead will also save time on those busy nights you want to get dinner on the table as quickly as possible.

Prep time: 10 minutes
Cooking time: n/a
Serves 4

Tip: You can also prepare the fajita seasoning in larger batches and store in an airtight container for later use.

Ingredients:

Homemade Fajita Seasoning:
  • 3 T. chili powder
  • 1½ T. smoked paprika
  • 2 t. onion powder
  • 2 t. garlic powder
  • 2 t. ground cumin
  • ½ t. cayenne pepper
  • 1 t. dried oregano
  • 2 t. sea salt
Cilantro-Lime Sauce:
  • 1 c. plain, full-fat Greek yogurt
  • 1-2 T. homemade fajita seasoning
  • 1 clove garlic, peeled and finely minced
  • 2 T. fresh cilantro, finely chopped
  • 2 T. fresh lime juice
  • Salt and black pepper, to taste

Directions:

1. Prepare the fajita seasoning by combining all ingredients in a small bowl and stirring until thoroughly blended. Store any excess in an airtight container for later use.

2. Prepare the cilantro-lime sauce by thoroughly combining all ingredients in a medium glass or other non-reactive bowl. Cover and place in the refrigerator until ready to use.This easy Slow Cooker Mexican Shredded Chicken with Cilantro Lime Rice is a breeze to fix and so delicious!

Check out a couple of my other recipes:

This dessert has the consistency and texture of a softer apple pie. Don't be frightened by the name. It's delicious. Click through the image for the recipe!

This Buffalo Chicken Lettuce Wraps are perfect for those busy nights! They came together in minutes, are low carb, and keto friendly!


Manifestation Babe 21 Day Money Challenge – Day 10 and 11

Such is life, eh? I got distracted for a few days with crazy stuffs going on around me, so I’ll do two days today, and then go from there as I try to catch back up on the 21 days.

Anywho… so day 10 is about shutting up your mind by way of journaling and meditation. Then, day 11 is about seeing it before you see it. Say what?!? Yeah – I know. Sounds crazy, but it’s about seeing it in your mind, before it shows up in your life. Got it? Good!

Grab the book and follow along with me, it’s called Unleash Your Inner Money Babe: Uplevel Your Money Mindset and Manifest $1,000 in 21 Days

Day 10 Discoveries

I love the day 10 exercise because Kahtrin wanted us to meditate, but check in with ourselves before and after we do it too. I had long avoided the idea of meditation because I thought it was silly, and I could never focus enough to actually do it. Then, I found guided meditations…let me tell you -HUGE GAME CHANGER!!!

I REALLY enjoy guided meditations. I use a combination of apps, Youtube, various websites, etc… to find guided meditations that work for me. One app I’m obsessed with is Insight Timer.

It’s free for Android and iOS phones, and has loads of various meditations for everything from helping you get more restful sleep to manifesting more money, and creating more confidence to forgiveness exercises.

If you struggle with keeping focused while meditating, I highly recommend trying guided meditations.

As for journaling – I don’t do that nearly as often as I wish I did. I get very distracted with it, and it end up being more of a word vomit page than anything focused.

Still, even doing the word vomit helps me a lot because it gets everything out of my head and onto the page so that I can focus on the things I really need to do that day!

I do enjoy focused journaling too though where you are given a specific topic and you journal on that.

I often look on Pinterest for journal prompts when I want to go beyond the word vomit. haha!

Day 11 Discoveries

Day 11 was all about visualization. I struggle with this a lot. I think it’s in large part due to the same things that cause me trouble with meditation and journaling- and that is lack of focus. My distraction gene is strong! SQUIRREL!

So, even for visualization, I have to have something to focus on. What I do for that is again go to Pinterest. I have boards set up for my dreams and I look at them and study them and focus on them, in order to get the visions in my brain. Whatever works, right?

Welp, that’s all for days 10 and 11 – tomorrow I’ll try and do days 12 and 13, then the next day I’ll do days 14 and 15 to be all caught up. Whether or not I actually do it – I guess that part is still to be determined. haha!

4 Things That You’re Probably Paying Too Much For

Have you ever received a bill in the mail to renew a service and you realized that

1) you were already paying for that same service with another company and

2) you were already covered for the same service by an even different company?

Here’s an example: Are you paying for towing assistance through a company like AAA? Take a look at your car warranty. Are you paying to include that? Now check your automobile insurance policy. Are you covered for towing? If you so then you’re already paying for that service.

Here’s a list so you can do your own inventory and find some savings in your budget where you too, can cut the fat!

Road-side Services

So, we’ve discussed this. But start here. Take a look at what you are currently paying for, what might have duplicate coverage and what you’d be able to drop altogether. You can save money by not renewing your road-side service and dropping the monthly towing and car rental package on your insurance because it might be covered under your car warranty. Before you drop anything, make sure the service you keep is what you truly need, you don’t want to be under-prepared, but you also don’t want to be double-paying for services you already have covered elsewhere.

TV Services

Here we’re talking about – Netflix, Redbox rentals, Hulu, Roku, Dish, Cable, Direct TV. All of it. Many people have multiple subscriptions but a quick analysis of your viewing habits can show you what your true needs are. It doesn’t make sense to keep two services when one does the job. You can save $1,022.40 this year by dropping an $80/month satellite service and skipping a $2.40 weekly trip to the big red box. Instead, just keep the streaming movie and TV series subscription. You might have to wait for a few weeks to watch the latest movies, but you probably won’t hate all that extra money you saved!

Phone/Internet/TV Services

We all know this, but how many of us actually DO this? Bundle, Bundle, Bundle! If you are going with a TV service as listed above, and you have internet or phone services, then be sure to get a bundle price. ALSO- never feel bad asking for a discount. If you see a new customer offer, (especially when you are out of contract) be sure to ask if they will extend the deal to you. You will have to speak to the customer retention department (rather than customer service) but they will likely offer to give you the same deal if you express your desire to go elsewhere if they can’t extend the offer to their loyal customers.

Internet

Unless you work from home then perhaps you should investigate using your cell phone as a hot spot to provide internet service for your devices. For just a little more a month (and sometimes it is a provided service, depending on your cell plan) you can use your cell phone service to also stream the internet. Make sure to check into this before forking over a monthly internet service.


Alternatively, you could cut the data service from your cell phone provider and use Wi-Fi on your phone instead. Think about how and where you use the internet and make the choice that will work best for you and your family.


Use these tips to start reviewing areas where you may be over paying, and start saving today! And don’t stop there! Make a list of other areas you thought of and get to work, saving your hard-earned dollars. Your piggy bank will squeal in delight!


Dollar Store: Deal or No Deal?

Everyone loves to get something at a discount. I mean, who doesn’t seriously L-O-V-E a good deal? However, one thing we all need to learn is how to discern if a deal really is the good bargain it seems to be.… A good deal has to actually be a good deal.

If you like to shop at a dollar store you might be making the mistake of assuming any item for a dollar is a good deal but that might not be true.

Here are a few tips to review before your next trip to the dollar store to make sure you are getting the real deals that are offered.

Make a List.

How many times have you run into a dollar store to pick up a couple of items and $76 later, you come out, hands full, with stuff you never intended to buy. You need a list of items to buy so you can avoid mindless shopping and blowing your budget on items you just don’t need!


What items should be on your list:

  • Office supplies
  • Art/School project supplies
  • Books
  • Cleaning supplies
  • Home Décor
  • Party Décor
  • Small Door Prizes
  • Stocking Stuffers
  • Hostess gifts (bath & body lotion, wash, pretty scented items)
  • Beauty Products (shampoo, soap, hair accessories, hair spray, cotton swabs, and etc.)
  • Batteries (they seem to last just as long as more pricey brands

What should NOT be on your list:

  • Medicine, (from a financial perspective alone, 8 pills for $1 isn’t a good deal!)
  • Toys
  • Plastic Wrap
  • Paper products like paper plates, cups, toilet paper- quantity and quality issues make this a no deal.


Something else you should not have on your list is any item you have not priced out prior- for example, food.

A can of vegetables seems like a great buy- it’s just a $1, right? But had you shopped at your grocery store, you could have gotten them for .50 cents or less on sale. It turns out that isn’t such a great deal after all. Another great example of this is meat. Our local dollar store sells bologna, ham, turkey, etc. for $1. But it’s a 1/8 of a pound so I am paying $8 for a pound of meat! No. Again, any item that you have not calculated at a comparable price at another store should not be bought at the dollar store. Chances are you will be overpaying.


Something to remember; always check the quantity of any item you are buying. $1 for a product simply packaged smaller is not a good deal, even when it feels like it! Run the numbers before you shop!

Super Easy Ways to Manage Bill Time

Bills and Pills; Bills and Pills” to quote Disney’s Pollyanna. No one likes them! But they are just some of life’s necessary evils.

While I can’t give you a pain-free experience when paying your bills, I can help you make the actual mechanisms of paying bills a breeze and sometimes, that’s half the battle.

In this wonderful word of technology, we have great tools available to us but in most cases, they are categorically under used! Below, we’ll discuss some tools in the toolbox of bill paying that you can use to make the process easier.

We’ll also address their pros and cons so you can decide which are right for you. Having a system, no matter what you choose, is the most important thing you can do to make your life easier.

Tool #1- Auto Pay.

Pros

Set it once and forget it! Often the vendor itself will have an auto-pay option on their website.

You simply enter the amount you want to pay, your routing and bank information, and date of debit, and you’re set up.

Your bills will be automatically debited each month.

Cons

If you run into some cash flow issues, you have to be sure to go in and change or cancel the debit date within the allotted period they allow you to change it, OR you will overdraft your bank account.

If you have irregular pay dates, this may not be a good option for you.

Hints: You can set your payment within the grace period even if it is after the due date without needing to request a payment date change. It’s usually 10 days, but don’t assume!

Make sure you check that you’re not accruing late fees or bad pay history by over-staying your grace date. Also, if you need to, vendors typically allow one due date change per account history, so if you know the due date won’t work for you, change the date. But choose wisely- typically you get only one shot!

Tool #2- Online Bill Pay.

Pros

This system is typically offered through your bank, although some vendors offer the one-time pay option as well on their websites.

Done right, you can spend an hour or so once a month, and set up the dates that you want the vendors to debit your account for that month’s bills.

This is a great system for those with irregular pay dates because you have more control and insight into your budget and cash flow for that month!

Cons

You have to invest time monthly to set up these payments.

Tool #3 – Banking Apps.

Pros

This is basically the mobile version of #2, but many people don’t remember to use the apps for their bank. You can do all the things on your app that you can do on their website in most cases, but they are more user-friendly.

The mobile banking app is convenient because you can utilize it while on-the-go (think lengthy medical appointments waiting room times, and dead times at the soccer field, etc.) so if you’re a multi-tasker, this is a great tool!

Cons

If you lose your phone or it’s stolen, you run the security risk of someone having access to your banking info. These days though, our phones are an extension of our wallets and we all know to treat it as such!

Just be sure to include security measures as you would for any other information you don’t want shared with a thief. (password protection, lost phone locator apps, and etc.)

With a little planning each month, your bill paying nightmares can be a dream! Don’t delay! Get a system in place today.


What Does Being Frugal Mean

There’s been a lot of talk about being frugal and being thrifty. Ever since the US economy took a downturn it’s been a popular topic in media and around the web.

Living frugally has also become a necessity for many of us. Let’s talk about what it means to be frugal, dispel some myths and misinformation and look at what it means to live frugally.

Being Frugal Doesn’t Mean You’re Poor or Cheap

There are two common misconceptions about frugality. The first is that people who live frugally are poor. It’s actually the opposite. People who live frugally are smart with their money and use it wisely.

As a result they aren’t drowning in debt and their bills get paid on time. Yes, you can live frugally on a small income, but many frugal people earn a decent living. They chose to live well below their means and spend money on what’s important to them.

Being frugal also doesn’t mean you’re cheap. Not having the biggest house on the block or the fanciest car in the neighborhood doesn’t make you cheap, it makes you smart.

Yes, it can be a fine line between being frugal and being cheap, but there is an important difference.

Being cheap often involves hurting someone else, while being frugal means you decide to forgo something so you can spend your money elsewhere or save it for a rainy day.

Here’s an example. Let’s say you’re going to your favorite fast food place and grab a burger and some fries. A cheap person will grab a big handful of ketchup packets to use at home later.

A frugal person will save any leftover ketchup packets and use them later so they don’t go to waste. It’s a fine line, but there’s a difference.

Being Frugal Means You’re Smart About Spending

The main thing I want you to understand about being frugal is that it means you’re smart about how and where you spend your money. It’s a conscious decision and often requires a bit of planning. Instead of giving in to impulse buys (be it groceries you don’t really need or a new pair of pretty shoes), a frugal person decides she doesn’t need those items and saves the money instead.

As a result she can then turn around and enjoy a fun vacation or make a down payment on a home. Or it may mean she can stay at home with the kids. Being frugal means you have options and that’s a beautiful thing to have.

Tips for Garage Organization and Storage

Garages have a tendency to become a catch all for things that don’t have a home elsewhere. It quickly can become a cluttered mess ad a place that you can no longer use it for its intended purpose, keeping your vehicle.

Because you don’t often spend much time in your garage and it’s a place that you tend to come and go it’s not a wonder that it can become the catch all for so many things and quickly turn into a cluttered mess. It doesn’t have to be that way though.

It can be a great place for storage of the proper items while also still being a place that you can park your car overnight. And, if you really have too much for your garage, you can always move it to Storage Units Pueblo CO – Find the Perfect Self Storage Unit for Your Needs.

In the meantime, here are tips for garage organization and storage.

* Zones. The garage is a multi-purpose room of your home so to speak. Its primary function is to store your vehicle, but you also probably keep yard supplies or gardening tools in there, bicycles, outdoor toys for kids, and maybe this is even where the laundry is located in your home. So to really organize this area you need to divide things into zones, however, if you are looking for more storage space, it may be worth searching for the Best Shed for the Money.

* If you are storing your vehicle in the garage (as you most likely are) then you need to be aware of how much clearance you need to be able to give yourself so that your vehicle can safely fit inside your garage and you’ll still be able to close the door.

You’ll want to make sure that you mark off on the floor with some tape where the end of your car has to go so you don’t end up finding that you can’t fit your car in the garage when all is said and done.

* Use freestanding units where you can. Metal cabinets are a nice way to store things especially if you want it out of sight.

* Shelves hung on the wall or shelving units themselves to put large and small storage bins on are a good storage solution in your garage.

* Flooring space might not be at a premium in your garage, especially when you park your car in there. This is why you must make good use of the walls and ceiling of the garage for storage. If you’re keen on your garage flooring maintaining an attractive appearance, you could always consider an epoxy garage floor coating.

Adding hooks and pegboards to the ceiling and walls will provide useful additional storage for gardening tools, bikes, and multiple other items. This will keep everything in its place.

* Don’t forget about the corners. You can really use a lot of storage space in the garage if you remember that you can put things in the corners.

When you begin the project of organizing the garage space and storing items, make sure you recognize what space you actually have to use to store your items. You might have to get creative in what you do. It also will be good to do some decluttering before you start.

No sense in trying to store things that are broken or that you are never going to use. If you get an idea of exactly what you need to store in the garage before you start it will go a long way to helping you fully utilize all of the space you have in your garage.

If you’re looking to expand the storage capacity of your car, for the purposes of a road trip, for example, you could look at investing in one of these carriers.